
How to Test Water Hardness Before and After a Softener
Content updated
Sources last checked
To check whether a water softener is reducing hardness, test two cold-water samples with the same kit: one untreated (before the softener) and one softened (after it). The treated result should be lower if the unit is operating as intended. Similar readings warrant a check of sample locations, bypass position, test method and cycle state before diagnosing the unit.
Quick version:
- Untreated sample: a cold tap confirmed to be upstream of the softener, or a suitable cold tap sampled with the softener's bypass set according to the exact manual. Outdoor faucets are not always untreated. Flush the line as the test kit directs.
- Softened sample: a cold tap confirmed to be downstream of the softener, with the bypass back in service. Flush the line as the test kit directs.
- Test both with the same test strips or drop-count kit, following the kit's instructions, and write down both numbers with the unit.
- Pick a normal moment, not during a regeneration, when many valves send untreated water to the house.
Pentair's Whole House manual uses hardness test strips for exactly this kind of periodic check and says to test at least twice a year. For setting the controller, you need the untreated hardness as a number, which a drop-count kit, your utility's water quality report or a lab test gives more precisely than a color band.
Testing rule: Same kit, same unit, cold water, one verified sample before the softener and one after. If an untreated sample requires bypass, follow the exact manual and stop if the valve is unidentified, stuck or leaking.
Choose the evidence source first
The right source depends on the decision. A rough range may answer “Is my water generally hard?” but not “What exact hardness should I enter in this controller?”
| Evidence source | Appropriate use | What to verify | Main limitation |
|---|---|---|---|
| Current utility information | Baseline hardness for a public-water address | Unit, date, distribution area, whether the value is an average or range | May omit hardness or differ from conditions at one home |
| Hardness test strip | Quick screening or a simple operational check when its bands are adequate | Range, color increments, expiration, timing, and whether it reports total hardness | Broad bands can hide a small or borderline change |
| Drop titration kit | Numeric before/after comparison when the kit's stated increment fits the task | Instructions, reagent condition, endpoint, conversion, and repeatability | Technique and endpoint judgment can affect the result |
| Laboratory or qualified water professional | Equipment-critical value, unclear plumbing, conflicting results, or broader water-quality questions | Accreditation or state recognition where applicable, method, unit, sample instructions, and scope | More time and cost; hardness alone still does not establish potability |
This ranking is decision-based, not a claim that every product in one category outperforms every product in another. Read the stated resolution and instructions for the specific kit or laboratory method.
Public-water report
EPA provides a Consumer Confidence Report finder for public-water customers. A report is a useful starting point, but hardness does not appear in every CCR. If it is missing, ask the utility for total hardness as calcium carbonate, the unit, the value or range that applies to your service area, and whether the source changes.
EPA's 2026 WaterSense guide says homeowners can determine hardness from a local water-quality report or a professional test. For a softener setting or purchase, confirm that a system-wide number is current and representative of the untreated water entering your home.
Home hardness test
Use a strip when its printed bands are sufficient for a screen. Use a titration kit when its labeled increments, range, and procedure provide the resolution your decision needs. Do not guess extra decimal places from a color block or drop count.
Follow the kit's directions exactly. Record the product, lot or expiration information when available, unit, stated increment, sample volume, wait time, and result. Repeat an unexpected result with fresh materials before changing equipment.
Laboratory or professional test
Escalate when the input will drive a material equipment decision, when home results conflict, when you cannot verify the sample point, or when the question extends beyond hardness. Ask the provider to report total hardness as CaCO3 and retain the sampling instructions and report.
For a private well, a hardness result is not a substitute for appropriate water-safety testing. EPA states that private well owners are responsible for the safety of their household water. Use your state or local well program, health authority, or an appropriately qualified laboratory for contaminant questions.
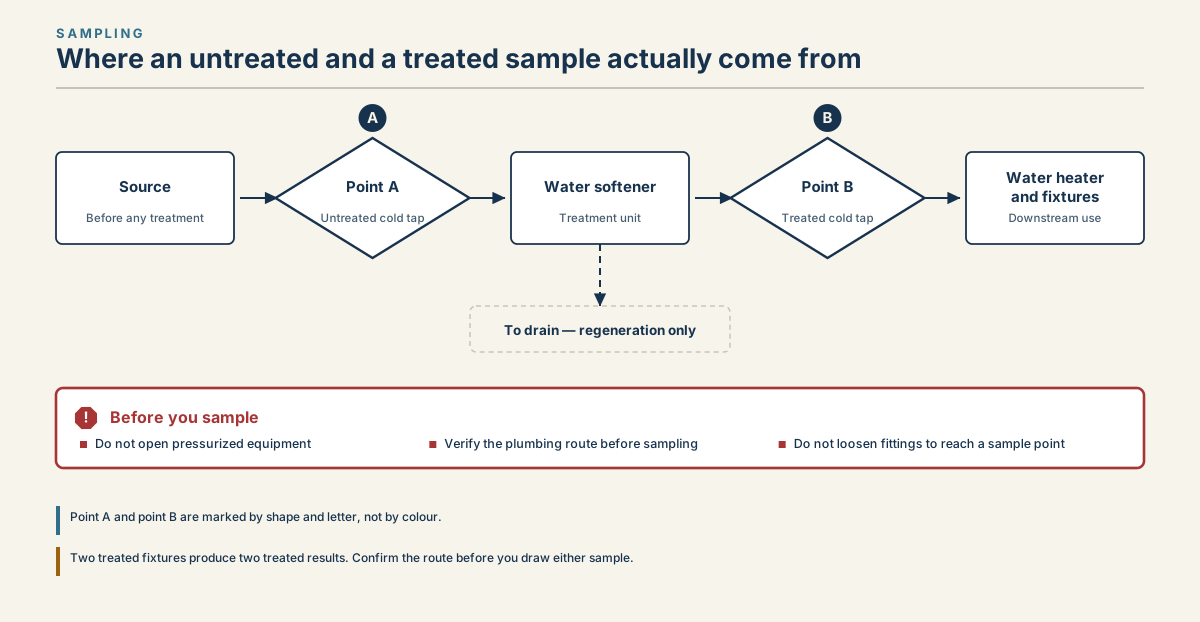
Water moves from the source past untreated sample point A, through a water softener, and past treated sample point B before reaching the water heater and household fixtures; a separate drain line operates during regeneration.
Read diagram in text
- SAMPLING
- Where an untreated and a treated sample actually come from
- Source
- Before any treatment
- Point A
- Untreated cold tap
- A
- Water softener
- Treatment unit
- Point B
- Treated cold tap
- B
- Water heater
- and fixtures
- Downstream use
- To drain — regeneration only
- !
- Before you sample
- Do not open pressurized equipment
- Verify the plumbing route before sampling
- Do not loosen fittings to reach a sample point
- Point A and point B are marked by shape and letter, not by colour.
- Two treated fixtures produce two treated results. Confirm the route before you draw either sample.

Prepare a before-and-after test plan
Define the question before opening a faucet:
- Baseline: What is the incoming hardness?
- Performance check: Is the softener reducing hardness now?
- Settings input: What verified untreated hardness should be used in the model's procedure?
- Troubleshooting record: Did a repeatable change occur after a documented service action?
For a performance check, plan two sample points and one method. Test close enough together that the source and operating conditions are comparable.
Sample-point diagram
PUBLIC MAIN OR PRIVATE WELL
             │
             ▼
   [A] VERIFIED UNTREATED COLD-WATER POINT
       Existing upstream faucet or sampling port
             │
             ▼
        WATER SOFTENER ─────────► DRAIN
             │                    (regeneration only)
             ▼
   [B] VERIFIED TREATED COLD-WATER POINT
       Downstream faucet served by the softener
             │
             ├────────► WATER HEATER
             └────────► OTHER TREATED FIXTURES
Do not assume an outdoor faucet is untreated; plumbing layouts differ. Verify the route from installation records, visible piping, or the owner’s manual. Do not open a pressurized tank, control valve, brine line, drain line, or plumbing connection to obtain a sample.
If the only apparent way to create untreated water is the bypass valve, use it solely as the model's manual directs. Record the position, allow for water already in downstream plumbing according to the chosen test method, and restore the correct service position. Stop if the valve is unidentified, stuck, leaking, or requires force.
Test untreated and softened water step by step
- Read the method first. Confirm the kit or laboratory instructions, units, range, expiration information, and required container.
- Verify the sample points. Identify point A before the softener and point B after it. Use cold-water outlets.
- Check operating state. Do not compare samples while the softener is regenerating or while a delayed regeneration is about to change conditions. Record service and bypass status.
- Prepare the outlet as directed. Follow the method's instructions for flushing, aerator handling, container preparation, and sample collection. Do not invent a universal flush time.
- Collect sample A. Label it “untreated” immediately and note the precise outlet.
- Collect sample B. Label it “treated.” Confirm the outlet actually receives softened cold water.
- Run the same method on both. Keep sample volume, timing, lighting, drop technique, and interpretation consistent.
- Repeat if needed. Repeat both samples when a result is surprising, near a decision boundary, outside the kit range, or inconsistent between trials.
- Record before converting. Preserve the original value and unit, then use the water hardness calculator if the controller or worksheet needs gpg.
A manufacturer may specify additional commissioning or performance-test steps. Those model-specific directions take priority.
Record the conditions that make the result reusable
Write down more than two numbers. At minimum, capture:
- date and local time;
- water source: public system or private well;
- test goal;
- method, product or laboratory, unit, and stated resolution;
- sample A and B locations;
- confirmation that each location is before or after the softener;
- cold or hot water;
- softener mode and whether regeneration recently occurred;
- bypass position;
- original result and repeated result, if any;
- any range, inequality, out-of-range signal, or uncertainty; and
- the next action and reason.
Use the printable Before/After Hardness Test Worksheet. It is a paper sheet: nothing is sent to this site, and no account is needed.
Interpret the result without overclaiming
First, make sure both values use the same unit. The water hardness guide explains mg/L, ppm, gpg, and the USGS classes.
| Observed pattern | What the comparison supports | What it does not prove | Sensible next check |
|---|---|---|---|
| Untreated high; treated materially lower | The sampled treated line had less hardness at that time | That every fixture is treated or the unit is optimally programmed | Repeat once, then compare with the model's stated procedure |
| Untreated and treated similar | No clear reduction was detected in this comparison | A specific failed component | Verify sample points, bypass/service state, regeneration status, method range, and repeatability |
| Both low | Little difference was measurable under these conditions | That the softener is unnecessary in every season or source condition | Confirm the untreated baseline is representative before changing equipment |
| Treated result higher | The result or test plan needs verification | That the softener added hardness | Recheck labels, plumbing route, method, units, and both samples |
| Result outside the kit range | The method cannot quantify the sample | The boundary value printed on the kit | Use an appropriate range or laboratory method |
There is no universal “passing” treated value for every model and situation. Compare the result with the product's manual, verified incoming hardness, operating conditions, and the purpose of the test.
USGS classifies hardness as soft at 0–60 mg/L as CaCO3, moderately hard at 61–120, hard at 121–180, and very hard above 180. Those general classes help describe untreated water; they are not a universal warranty test for a softener.
Common water-hardness testing mistakes
- Sampling two treated fixtures instead of one untreated and one treated point
- Assuming every outdoor faucet bypasses the softener
- Testing hot water, which may reflect stored water and a different route
- Comparing a utility average with a home strip as if the methods, dates, and locations were identical
- Recording “7” without a unit
- Converting a calcium-only or total-dissolved-solids result as total hardness
- Reading a strip outside its specified time window
- Using expired or poorly stored reagent
- Rounding before applying a classification boundary
- Testing during regeneration without documenting it
- Changing the bypass position without following the model's instructions
- Treating a hardness result as a contaminant or potability test
When to stop and use a professional or laboratory
Stop the home comparison and seek qualified help when:
- obtaining a sample would require opening, loosening, or disassembling pressurized equipment;
- the bypass or another valve is stuck, leaking, unidentified, or difficult to operate;
- repeated results conflict enough to affect sizing or programming;
- the result is outside the test method's range;
- you cannot verify whether a fixture is upstream or downstream;
- a private-well question involves drinking-water safety rather than hardness alone;
- water changes color, odor, or clarity unexpectedly and you do not know why; or
- the equipment manual calls for a service procedure rather than a homeowner check.
Do not use the softener to address water of unknown microbiological quality unless the system and overall treatment plan are specifically designed and validated for that use. A cited Pentair manual, for example, warns against installing its system on microbiologically unsafe or unknown-quality water without adequate disinfection. That is a model-specific warning consistent with the broader rule: hardness treatment is not broad purification.
Turn the result into the next decision
- Keep the original untreated result, unit, method, date, and sample point.
- Convert it to gpg only if your equipment documentation uses gpg.
- If sizing equipment, combine the verified untreated hardness with household water use and usable capacity. Hardness alone is not enough.
- If checking an existing softener, compare the before/after result with its manual before changing settings.
- If the concern is water safety, leave the hardness workflow and use the appropriate local laboratory or health-authority pathway.
The goal is a traceable comparison, not the lowest possible number. A repeatable record makes the next sizing, settings, or service decision easier to review and correct.
Frequently asked questions
Where should I test water hardness before and after a softener?
Use one verified cold-water point upstream of the softener and one verified point downstream. Avoid fixtures whose route is uncertain or may blend treated and untreated water. Record both sample locations, bypass position and recent regeneration status so another person can understand what the comparison actually measured.
Can I use water hardness test strips?
Yes, for checking whether the softener is working. Pentair's Whole House manual uses strips for periodic checks, at least twice a year. Strips read in color bands, so for setting the controller's hardness a drop-count kit, your utility's report or a lab result gives a more precise number. Use the same method for both samples.
How long should I wait after regeneration before testing?
Wait until the controller returns to normal service, then follow the test method's flushing and sampling instructions at a verified treated cold-water tap. There is no single flush time for every installation. Record the cycle context; the cited Pentair system sends untreated water to the home during regeneration.
Does a low treated-water hardness result prove the softener is working correctly?
It shows hardness reduction at that sample point and time. It does not prove long-term capacity, salt efficiency, correct regeneration frequency, contaminant removal or drinking-water safety. Compare repeated results with settings, water use, cycle records and the exact manual before making a broader performance claim.
Sources
Sources were consulted on the dates shown.
- U.S. Environmental Protection Agency WaterSense, Guide to Selecting and Maintaining a Water-Efficient Water Softener, May 2026; consulted August 27, 2026.
- U.S. Environmental Protection Agency, Consumer Confidence Reports, updated June 24, 2026; consulted August 27, 2026.
- U.S. Environmental Protection Agency, Private Drinking Water Wells, updated August 25, 2026; consulted August 27, 2026.
- U.S. Geological Survey, Hardness of Water, updated August 24, 2026; consulted August 27, 2026.
- Pentair, Whole House Water Softening System Installation and Operation Manual; consulted September 24, 2026.
- Pentair, Pentair 5600SXT manual; consulted September 24, 2026.
Before you continue
Every instruction here refers to the exact model on your unit's data plate. There is no universal button sequence: check the manual for your model before acting.